Introduction to GitHub Pages and why it’s the chosen platform for this blog
This post is split into two parts, if you are already sold on GitHub Pages and want a technical overview of how I set it up, please click here to be taken directly to the tutorial. If you are interested in understanding why I chose this platform please continue reading below.
As the tag line of this site and the themes highlighted in my initial post would indicate, the primary driver for setting up this site was to document my learnings of modern cloud technologies. To gain the full operational benefit of “the cloud” relies on automating all aspects of the environment, including the ability to rapidly provision and manage infrastructure.
The concept of Infrastructure as Code introduces an infrastructure deployment process which describes in text files the desired state of the systems. While the theory is sound, through the ability to create immutable repeatable infrastructure, it introduces a new challenge of managing and sharing the source files used in the process.
In a large environment, this will consist of hundreds if not thousands of files, including multiple versions. These files all need to be created and maintained by several people across the organisation. Keeping these files organised can quickly become a management burden. Source control or version control is the practice of tracking and managing changes to code. Source control management (SCM) is the classification given to the tools that operate this process. SCM is a system which provides a running history of code development and helps to resolve conflicts when merging contributions from multiple sources.
There are several SCM tools available the most common and widely used of these tools is Git. The use of Git or SCM systems, in general, has traditionally been associated with the developer community. This observation is no longer valid, with its adoption rapidly increasing across the full range of IT roles. Familiarity with SCM tools is quickly becoming a must-have skill for developers and systems administrators alike.

Git is a distributed version-control system for tracking changes in source code during software development. It is designed for coordinating work among programmers, but it can be used to track changes in any set of files. Its goals include speed, data integrity, and support for distributed, non-linear workflows.
When selecting a blogging platform, I wanted something that integrated a content management system while learning the basics of Git. While technically any project containing source files can be managed by Git, I was looking for a platform that is easy to use and had content creation at it’s core.
GitHub Pages meets this brief perfectly. GitHub Pages is a free static website hosting service from GitHub that renders files from a Git managed cloud repository and publishes them as a website. In addition to the learning opportunities, the use of a static hosting service has many advantages. There are no databases to maintain, no plugins to manage, no security updates to install and with the removal of these overheads page load speed are greatly enhanced.
When comparing against a traditional blogging platform, you might think with the removal of all these features that using a static website, functionality would be reduced. This is where the use of static site generator (SSG) applications comes in. SSG is a software package that you run on your workstation that creates HTML files based on templates you specify and formats them for publishing to the web. There are several SSG’s available the focus of this post is Jekyll as it’s natively supported by GitHub Pages.

Jekyll does what you tell it to do — no more, no less. It doesn’t try to outsmart users by making bold assumptions, nor does it burden them with needless complexity and configuration. Put simply, Jekyll gets out of your way and allows you to concentrate on what truly matters: your content.
In summary, while all the technologies mentioned above have a direct connection with Git they offer very different functionality and can confuse a beginner or even a seasoned professional when getting started;
- Git: Tool for working with source files
- GitHub: A cloud-based repository to store Git managed source files
- GitHub Pages: Renders source files to be displayed as a website
- Jekyll: Tool used to generate HTML pages which can be pushed GitHub and rendered as a website
The rest of this post will cover off the steps for getting started with GitHub Pages.
Basic SetupPermalink
The first step to getting started with GitHub Pages is to create a GitHub account. Head to the GitHub sign up page to create an account.

Creating a RepositoryPermalink
Now that you have a GitHub account, the next step is creating a cloud repository to host your source files that are to be rendered as a webpage.
Select New from the top left corner of GitHub dashboard.

Typically when naming a repository you can name it whatever you like, as long as it is unique for your GitHub account. GitHub Pages has a unique requirement in that the repository must be named ‘username.github.io’ to properly render the files that it contains as a website.
The username for my demo account is ‘gac-cloud-demo’ so I will name my repository ‘gac-cloud-demo.github.io’.
Make sure your repository is set to public so the content is visible to all, then select ‘Create repository’.
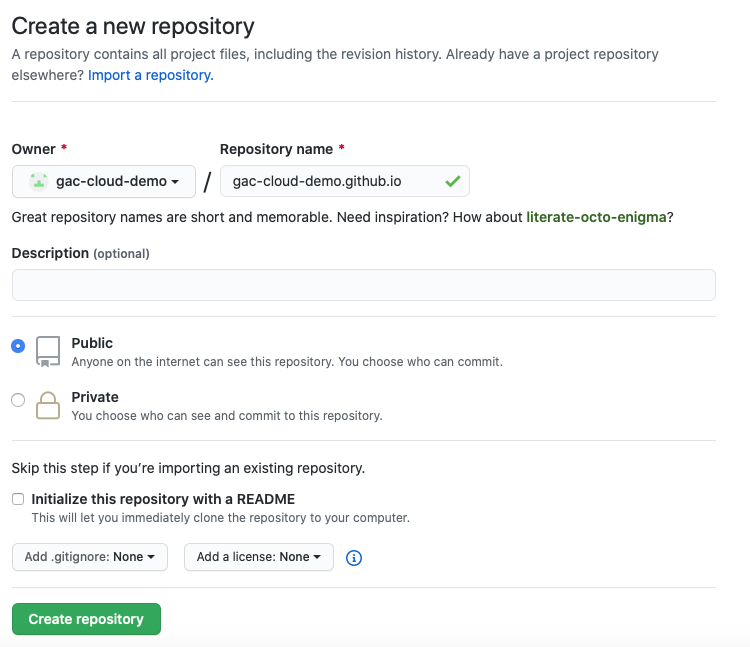
Take note of the HTTPS URL you will need this later.

Installing GitPermalink
In this post I will cover the installation methods I use for Windows and Mac only. Git is available on Windows, Mac and Linux for installation instruction for the Linux distribution of your choice please visit;
Now you need to install Git on your local computer to create a local Git repository that will eventually be synced with the GitHub repository you just created.
WindowsPermalink
To install Git on my Windows workstation I used the Chocolatey package manager, which is my preferred method for managing application installations, for more details on Chocolatey please visit;
Install ChocolateyPermalink
To install Chocolatey first open PowerShell as an Administrator
Set-ExecutionPolicy Bypass -Scope Process -Force; [System.Net.ServicePointManager]::SecurityProtocol = [System.Net.ServicePointManager]::SecurityProtocol -bor 3072; iex ((New-Object System.Net.WebClient).DownloadString('https://chocolatey.org/install.ps1'))
Close Powershell window
Install Git packagePermalink
Open PowerShell as an Administrator
choco install Git
Close and reopen PowerShell as a standard user
To confirm Git has been successfully installed run the following command
git --version
At the time of writing, this would return
git version 2.28.0.windows.1
Your PC is now set up and ready to use Git on your local computer and push content to a GitHub repository.
macOSPermalink
There are several options available for installing Git on macOS. If you already have the XCode Command Line Tools installed it’s likely that Git will already be available. To install Git on my macOS workstation, like Windows my preferred method for managing packages is to use a package manager. The package manager for macOS is HomeBrew, for more details please visit;
Install HomebrewPermalink
Open a new Terminal window
/bin/bash -c "$(curl -fsSL https://raw.githubusercontent.com/Homebrew/install/master/install.sh)"
Close Terminal
Install Git packagePermalink
Open Terminal
brew install git
Close and reopen Terminal
To confirm Git has been successfully installed run the following command
git --version
At the time of writing, this would return
git version 2.28.0
Your Mac is now set up and ready to use Git on your local computer and push content to a GitHub repository.
GitHub PagesPermalink
Now that we have a GitHub account and a functioning installation of Git on our Windows PC or Mac, the next steps are to create some content to be used by GitHub Pages and commit it to a Git repository.
I will cover the basics of using two content types with GitHub Pages, HTML and Markdown as well as highlight the differences between the two. For an in-depth look at GitHub Pages please visit;
https://docs.github.com/en/github/working-with-github-pages
Basic HTMLPermalink
Open your console of choice (PowerShell / Terminal)
Create a directory for your files
mkdir gac-cloud-demo
cd gac-cloud-demo
Create the HTML file
echo "<h1>Hello GitHub Pages</h1>" >> index.html
Now it’s time to start working with Git
Initialise your local Git repository
git init
Add files to be tracked by version control to your local Git repository
git add index.html
Commit the changes
git commit -m "first commit"
You now have our first files being tracked by version control
To enable the content ypu have just created to be uploaded to GitHub we need to link your local Git repository with the Cloud-hosted GitHub repository we created earlier.
Copy the HTTPS URL for our GitHub pages repository

Using this URL you then need issue the command to link your repositories
git remote add origin https://github.com/gac-cloud-demo/gac-cloud-demo.github.io.git
Now that the repositories are linked you need to push the committed files in your local Git repository to your cloud repository.
As this is the first time we are pushing files you need to tell Git which branch to push your changes to. The default branch is ‘master’ which exists on every repository.
git push -u origin master
Now that the files have been uploaded you can check in on your website. First check your GitHub Pages settings, if we named our repository ‘username.github.io’ these should be configured by default.
Log into your GitHub account and confirm the Github pages settings match the following;
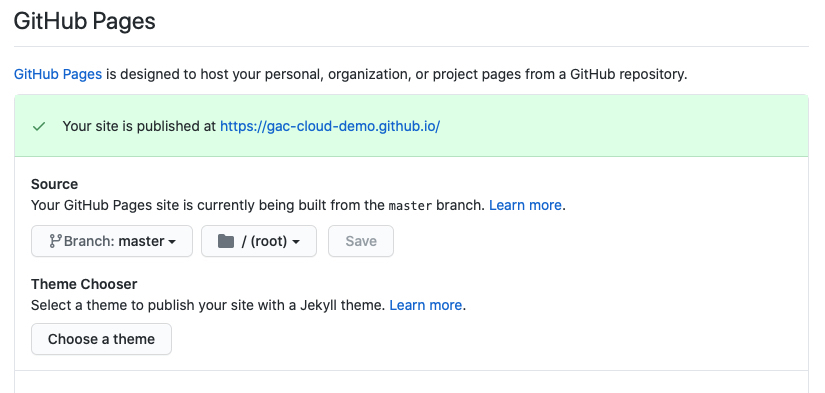
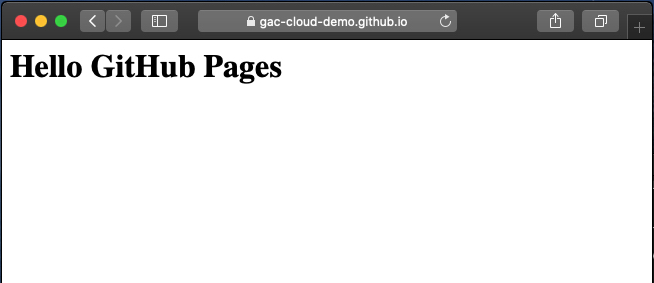
Now open your preferred web browser and visit your GitHub Pages URL and you will see the rendered HTML.
NOTE: If this is the first time browsing it can take a few minutes for GitHub to populate the content.
For me my GitHub Pages URL is;
http://gac-cloud-demo.github.io
Basic MarkDownPermalink
Markdown is a lightweight markup language with a plain-text-formatting syntax, removing the requirement to add complex tags to format documents. The primary use case for this is HTML, taking a simple human-readable text file and having it converted to structurally correct HTML ready to be displayed on the web.
GitHub Pages allows you to use Markdown files to create content through the built-in integration with Jekyll. By default, every file saved in a GitHub Pages repository will be rendered by Jekyll. Through the use of a template, you can take these simple text files and have them displayed to the web in a visually pleasing way.
In the same local directory you were working in before, create a new Markdown file.
echo "# Hello GitHub Pages" >> index.md
You are replacing your HTML files with Markdown you need to exclude the HTML file created previously from being tracked by version control.
git rm index.html
Add the new Markdown file to be tracked
git add index.md
git commit -m "Markdown commit"
As you linked our local and remote repositories earlier, we can simply run a Git push.
git push
Visit your GitHub Pages URL and you should see the rendered Markdown file.

You will notice the formatting is slightly different. This is Jekyll formatting the content using the default template.
GitHub Pages offer a variety of templates you can use to format your content.

Select a new template, for this demo, I used ‘Slate’.
Browse to your URL again and you will see the new formatting.
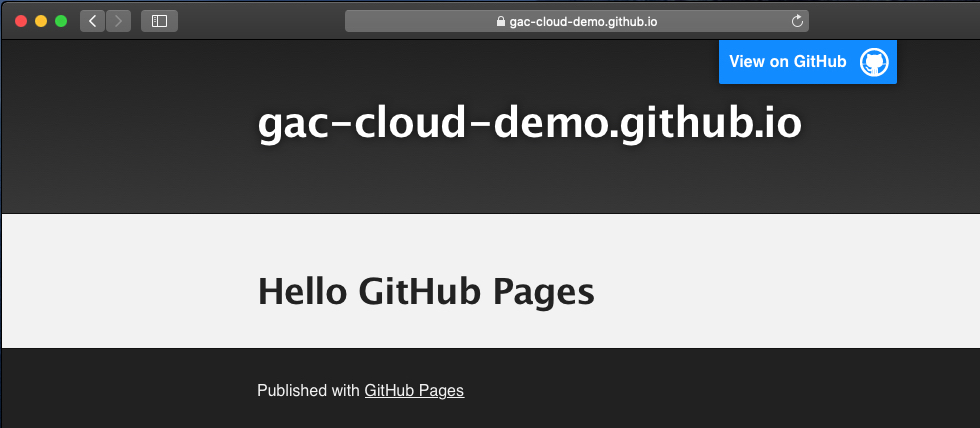
This is the power of writing in Markdown. Removing all the complex formatting tags and focusing purely on creating the content.
For example, please visit my GitHub profile and view the Markdown file for this post.
What’s NextPermalink
The next post will cover using a custom theme and some of the Jekyll tweaks I have used to create ChrisCoombes.com.
If you found this article useful, please let me know at @ccoombes83 or email me at ccoombes@outlook.com.


Comments